Showing posts with label Makeup guide. Show all posts

8 How-to Makeup Application Techniques

8 How-to Makeup Application Techniques

Today I thought I would do a little tutorial of sorts. I often assume that people know most of the makeup basics. But then I actually hang around human beings that aren’t Johnny Clyde, and realize that unless someone teaches you or you seek out tutorial online, most people really don’t know many little tricks there are that make our makeup lives easier.
I guess this post is inspired by Mother. I got her a cushion upon her request and sneaked a peek at her applying it. That is when I realised that unless you happen to come upon videos of people applying cushions, you might not automatically dab it all over your face. After all, dabbing is really not the most natural of actions for us. And yes, in case you were wondering, she did indeed rub the cushion all over her face. The finish is not too bad when that is done, but it is a tad streaky and thick.
So after explaining to Mother how to use a cushion puff, she just blinked at me and told me to demonstrate. I guess explaining some movements and actions with words can be a little confusing.
I remember when I got a beauty blender and the internet told me to bounce it off my face.
Well, that first try didn’t end well.
The beauty blender landed on the floor and my face stayed makeup free.
So here are a few of those little tricks that I have learned over the years that some of you might not be entirely familiar with. Demonstrated through the miracle of video and photography.

How to Curl your lashes
This is one that I haven’t been doing right for most of my life. I mean this is not science but changing up the technique really gives you much more natural results. I used to just squeeze close to my roots and call it at day but it made my lashes stick straight up and look a little strange.
The secret is to curl them gradually. First you find a spot as close to your root as possible without pinching your skin, then you slowly close the curler and hold for a few seconds. You then work your way up a little and repeat. You do this until you run out of lashes. This techniques ensures a nice curve instead of a 90 degree edge.

lashcurlergif


How to apply Mascara
This was supposed to just be a trick on what not to do with your Mascara but since I was already filming I thought I might as well show the application method. When working as a skincare consultant, I got the chance to meet a lot of wonderful makeup artists. One of these knowledgeable fellows explained a few of the Mascara basics to me. First of all, wipe the tip of the wand on a tissue.
This has two reasons: if you leave it on there is too much product on the wand which will turn your lashes goopy. The other is that when you wipe it on the tube instead (what I used to do of course), it makes the mascara get clumpy. And yes you need to do that every time of course!
The second thing is, never ever pump your wand in the Mascara tube. It enables air to get into it and will make your product dry out faster. These might not seem like super important steps but let me tell you. Since applying these I have never had a Mascara clump or dry out on me. Even though I don’t use them often I end up replacing mine eventually, but I have Mascaras that are a couple of years old (which I don’t use) that are neither dry nor clumpy.
When it comes to application, I noticed that people often don’t pay attention to the root or tips of their lashes. First off you go as close to your lash roots as you can and with an upward motion wipe the wand to the sides. I like to slightly close my eyes to give it an even better push.
When this is done, you then separate the lashes in the middle with the same wand and to finish it off you go over your tips. The tips are often so light they are practically invisible (my lashes are very black but I can’t see my tips either) so applying Mascara on them makes your lashes look even longer. Repeat one or two more times until desired effect. I usually only use one dip into the product for both eyes. And remember it is always better to layer a few thin layers than start with one thick one.

mascaragif


How to tightline your lashes
Tightlining lashes is done to make them look longer and thicker by blackening the roots and or the upper waterline of your eyes. It is also a technique used in moments where one wants defined eyes without a visible liner or for people with small eyes that have no space for thick black lines.
I personally love tightening and have been doing a version of it for years. Since I discovered my current method, I practically stopped using mascara, something that I love since I am not fond of removing waterproof products. Back in the days some people said to “stamp” the Mascara wand on the roots to tightline the lashes. Guerlain even came out with a very practical two sided mascara.
With one end containing a wand to easily tightline them.
Now people generally use pencils or gels. I usually use pencils since I do not own a black gel.
For this demonstration I used eyeshadow by wetting the brush first and then picking up the color.
I actually really like the effect and prefer it to the way the pencil looks.
But for every day makeup I will continue using the pencil for convenience sake.

Method 1:
One way to tightline is to simply put the pencil in the corner of your eyes, close them and drag the pencil across. This usually also blackens the bottom waterline. This is the easiest way to do it but I find it is more like a tightlining cheat than actual tightlining since it darkens the upper waterline but doesn’t really get in between the lashes. The differences aren’t huge though and this method looks great too.

tightline1
I confess I was excessively drawing on my waterline. For demonstration purposes of course!

Method 2:
The second method is to simple draw really closely to the roots of your lashes. Some people like to hold their lid up but I prefer to not do that since it is hard to coordinate for me.
To tightline with gel or shadow you simply dip your brush and sort of “stamp” draw really closely to your roots. I like to do this as the first step of my makeup, with either method, to be able to clean anything up in case I draw on my lid.

tightline2
You can see that my left eye looks more defined due to the tightlining


How to apply concealer
This method is widely circulated online, but I thought I would just add this one too since I was already doing a full face of makeup. This technique can be used with concealer or even BB/CC creams/foundation.
Dot a triangle shape under your eyes. The amount of dots differ but I usually do 3 - 4 since that pretty much covers the entire area.

concealergif

 Then either blend the color by dabbing with your finger, the small tip of a beauty blender or a cushion sponge. This way it will simply give you a better shaped brightness to your face while concealing the dark circles.

How to apply Foundation with a beauty blender
I used to always apply foundation with my fingers since I couldn’t be bothered to use a brush.
I was also complaining that my foundation never looked as natural as I would like.
Eventually I decided to pick up a beauty blender since I read that the finish was more natural than when a brush or regular sponge was used. I have to say this is one of those internet must-haves that is completely true. Beauty blenders are great and applying anything on your face, using them gives you a really natural finish.
I use them for foundation products (in this case BB cream), concealer and sometimes blush.
First you wet the sponge and squeeze as much water out as you can. This avoids the sponge to soak up too much product and lets you apply a sheerer layer. Then either dot the product on your face, or add it to the blender. Proceed to bounce it all over your face. Use the small tip to get into the corners of the nose and around the eyes.
Repeat as necessary to cover imperfections. I often skip concealer and simply layer it until my face looks even in the areas that need a little bit more coverage.

beautyblendergif

How to apply Foundation with a cushion sponge
I admit I don’t actually own a cushion. It is not that I don’t like them but I never really use foundation on my face yet I still own a few BB and CC creams. I do not see the point of actually owning any cushions if they won’t be used. Luckily I got to extensively test them though so I am not completely new in the cushion world. I love cushion sponges and have already bought a few different ones to use on their own. To me they are the Asian version of the beauty blender.
They help give a very natural looking finish only that they are more convenient since they don’t require water and are easier to travel with. When using a cushion sponge I either dab the foundation on my face like I did with the beauty blender or dip the sponge gently into the product that I have on the back of my hand. Then I proceed to dab the sponge all over my face. You can go back and apply more layers to areas that need it as well.

cushionbpuffgif


How to use a Lip Tint as Blush

I have seen this technique shown in Korean beauty shows that I don’t watch as often as I would like.
I actually don’t use this myself unless I don’t have blush on hand, or don’t have a matching blush in my collection. The principle is simple, you mix some foundation with some tint until you get the desired color. You then dab the mixture in whatever shape you like on your face and follow up blending it with either a beauty blender or a cushion sponge. The finish is very natural and glowy.
It can of course be layered until desired strength is achieved.

blushgif

How to line your lips
Lip liner might be out of style but I still love the way it looks and line my lips any time I wear proper lipstick. Using a liner can change the color of your lipstick and also give it way better staying powers. Some lip liners can also be used as your sole lip color which can be great since they tend to be longer lasting than lipsticks. Also a lovely way to get the perfect matte shade!
Start by defining your cupids bow and then simply trace the corners either down or up to finish the shape of the top lip. Then draw the line in the middle of your lower lip and then unite the sides with that middle line. Some people like to make a few shorter lines to better control the movement and shape and some people draw their entire lip with one sweep.

lipliner

I generally do four strokes on the top and one or two at the bottom. It is up to you and what you are more comfortable with. Then proceed to fill in your entire lip area. Doing so avoids the dreaded 90s liner look.


That was it for today, dear Batlings. I hope these were a few helpful tips that might make your next makeup application a little easier.
If there is any other methods you would like explained let me know and I am happy to oblige.
What are your favorite makeup application techniques?
À bientôt and until another time!
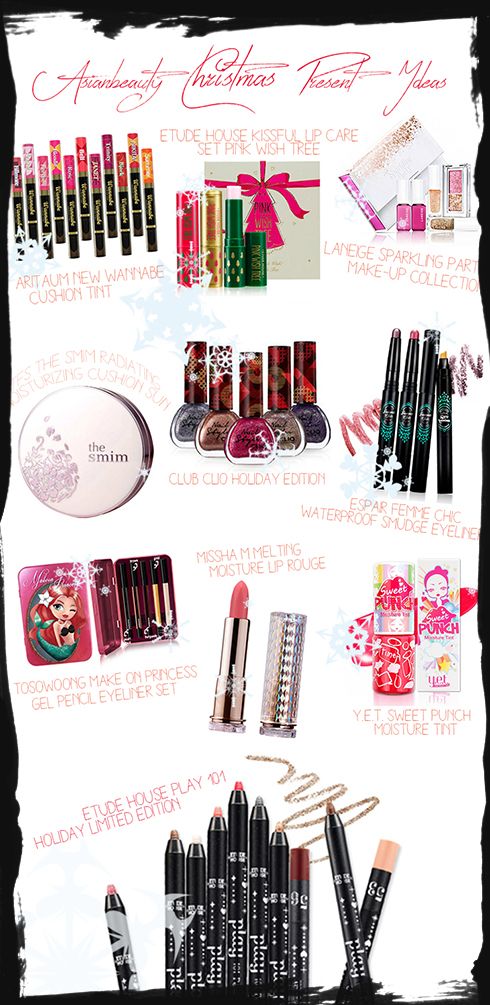
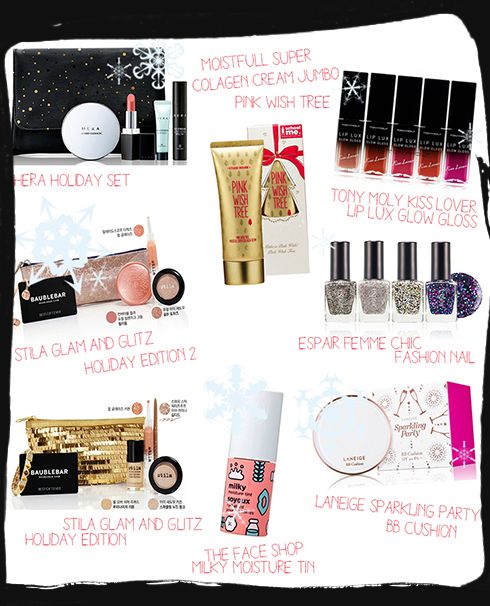
Yule extravaganza: Sam's Christmas Asian Beauty ideas

Dear readers of Moi Sanom's Blog!

I have the honor to be writing a guest post on this lovely blog today, nice to meet you everyone! My name is Sam and I am writing over at Colorcrrush.com. We both are big fans of Asian skincare which is also the reason how we met in the depths of the World Wide Web. Since Christmas is rolling around the corner, we wanted to give you some sparkly special content and I hope you'll like what we came up with.

We decided to collect some ideas for Asian beauty related Christmas ideas! I actually wanted to post this last Sunday on the 1st advent but life happened and got between me and my posting routine. My boyfriend's older brother's son was born on Wednesday! Family has a new member when I return next year, as I am living abroad in Korea at the moment. :) So I apologize for the delay - please imagine a cozy Sunday 1st advent evening when reading this post and make yourself a hot cup of tea/coffee/cocoa of your choice. (On a related note, we had our first snow in Seoul this week!)

Me and Moi Sanom noticed that a lot of our readers in the last weeks were really curious about possible Christmas ideas for our beloved moms/sisters/cousins so here I present you.... Asian beauty related Christmas ideas for every budget! :) It's a mix of very affordable items such as Etude House, more fancy ones such as Laneige and quite expensive special ones from Stila. Enjoy! 


Some of the things here I am eyeing myself... I am still debating whether to get the Laneige Sparkling Party set or not. I should probably save some money.. but then again, it's only Christmas once a year, right? Most items can be found either on Wishtrend or Jolse - only a few I did find on Gmarket but I tried to limit those so that you are actually able to get the stuff in case something caught your eye :)

Happy shopping everyone and don't forget your loved ones this month! Thank you Moi Sanom for doing this collaboration and I hope to do even more interesting things together in the future!

Love,

Sam

Cesare the Somnambulist Makeup Tutorial


https://www.tumblr.com/search/The+Cabinet+of+Dr+Caligari

I had the idea of making a Cabinet of Dr. Caligari inspired photo shoot for a while.
I absolutely love the film and it has been a great source of inspiration for years now.
You can really tell that this is also the case for many other artists such as Tim Burton.
It is a cinematic master piece which should be watched by everyone.
Since I wanted to make a simple tutorial for Halloween this year, I thought Cesare would be suitable since it doesn’t require too many items and is also a look that shouldn’t be perfect.
That is an important factor if you attempt creating a look on Johnny Clyde, the wobbliest person on earth.
Since he is so wobbly, there is no way I can draw a straight line on him or make anything even at all. There were even some steps I had to skip since he thought they were unbearable. One of them was to draw on the waterline since he couldn't take the feeling of his eyeball being drawn on (not that I was drawing on his eyeball, but no use convincing him of that fact).

Cesare the Somnambulist Makeup Tutorial
Scheming applicational disruptions!
First up, prep your skin as well as possible!
I skipped this step (don’t ask me why!) and the make up didn’t apply as evenly as I’d liked.
Exfoliation, a good moisturizer and possible a primer should definitely be used depending on the white paint you choose.
I used the face paint that came in my Halloween Memebox (unboxing coming soon), and since I wanted to test it out I didn’t use a primer.
I applied the paint to the entire face using a little egg shaped sponge dabbing the product on in thin layers until it built up to a more opaque shade of white.

Cesare the Somnambulist Makeup Tutorial

If you are a man, this can be done on a 3 day beard, but it is hard to get the color through the hairs, so a shaved face might be easier to work with.
Next, I contoured the cheeks a bit to make the face look more gaunt.
You can either do that or contour around your lips for the signature Cesare look.
I did not do this since Johnny has facial hair and it would just look like a goatee.
I recommend powdering the whole face with translucent powder since it makes the next steps easier.
I didn't (for testing purposes) and it made it more difficult for the color to be added evenly without smudging.

Cesare the Somnambulist Makeup Tutorial
The contouring looks a little uneven since his cheeks are unpowdered
Afterwards I added a thin black line above the upper lash line to give the eyes some definition.
I drew it further out to the side in a little tail.
I then marked the middle of the eye with a dot to be able to add lines on each side to create a triangle underneath the eye.
I used a regular black eye pencil for this.
I recommend using a waterproof one that doesn’t smudge too much.
Mine was pretty crappy so it started creasing and moving around pretty fast.
I then painted a little half moon on the inner corner of the eye to create a hollow look.
I smudged it a little for it to blend in better.

Cesare the Somnambulist Makeup Tutorial
First add bigger dots and then make a line following the little dots
The eyebrows were filled with the same dark pencil with squared off corners which were then brushed with a spooly to look a little less like fake pieces of fur and more like eyebrows.

Cesare the Somnambulist Makeup Tutorial
You can see my crappy pencil smudged after 5 minutes of application already
The lips were completely covered with foundation as well.
Cesares lips a relatively thin so I had to hide Johnnys thicker lips to create that look.
I then filled in the lips in the same shape only thinner, making them look a little wider than they originally were without looking too artificial.

Cesare the Somnambulist Makeup Tutorial
You can see his lips end just underneath the moustache
I decided to adapt Cesares look to Johnnys face instead of doing it just as it was on screen.
I feel like makeup can either work with someones face or try to change the face and I always belonged to the work with the facial features type of person.
I tried to convince Johnny to go scare some people on the street but that seems to be on schedule for next week instead.

Cesare the Somnambulist Makeup Tutorial
Practically twins!
And that is it little Batlings!
I hope you liked the tutorial.
Is there any looks that you always wanted to recreate?
P.s: We actually live right next to where The Cabinet of Dr. Caligari was filmed. There is a little plaque and everything!

Cesare the Somnambulist Makeup Tutorial
This is going to haunt my nightmares!

How to look (pretty) dead Tutorial

We are both wearing a variation of this tutorial (yes men can wear it too!)
It is October and Halloween is looming over us.
I thought this might be a great opportunity to share this tutorial with you since it might be a nice alternative for some of you to look spooky if you are not too much into theatrical make up.
I have to be honest here, I wear this look often, and not just in October.
I think I actually took these photos in March.
So, yeah, I have been wanting to post this look for quite a while.

It is no lie that I like the disheveled and slightly sickly look.
I started loving it when I was actually quite sick myself. I was practically bedridden for a year and looked quite ill. I felt awful during that time but for some strange reason my face looked great (at least for me).  I stopped using make-up completely during that period and have not really used any since. I do for looks, for fun or special occasions, but even then I usually don’t follow the rules and take a lot of short cuts. I guess what I like about this look is that it is very basic and simple, and many variations can be added depending on what level of corpsey you want to achieve.

These are the steps I used, but as I said you can add or take away which ever step you like.
Depending on my mood I mix it up to achieve a variety of pretty dead looks.

First off I applied a green primer. 

This is a great way to take away all the redness (aka blood, aka what makes you look alive) out of your face.
Since I am tan this is not something that looks natural at all.
It makes me one to two shades lighter depending on the season.
In this particular photo it was still Wintertime so my skin was super patchy and was at its lightest.

How to look (pretty) dead tutorial
I used the Face Shop Lovely Meex primer in Green and applied it only to half of the face for shade comparison
If you would like to make this look more natural, simply don't use green or lightening primer and match your foundation to your skin tone.
I didn’t use any foundation since I didn’t think it was necessary (and I don’t like using any), but it can be used if that is what you usually do.
This would also be the step to add concealer. I didn’t do that either since I wanted to keep any dark circles I had naturally. They are quite visible when the primer is added since the contrast becomes much bigger.

I topped off the primer with my trusted Tonymoly Cats Wink powder. 
It diminishes the appearance of my pores with some kind of blur magic and doesn’t make my skin look too dry.
This look can definitely be done on dewy skin, but dewiness is a sign of health so I usually go for the matte look.

How to look (pretty) dead tutorial
Applying Make-up in a onesie is a must in my household!
After I powder my face, I contour it.
If you use cream contour you would do this step before the powder.
Since my face is long and oval without much bones I use contouring to make my face look more bony and gaunt.
I make a straight line from my ears towards my nose to make my cheekbones stand out more.
If you want your face to be longer looking you would angle that line slightly towards your jaw.
I then simply follow my jaw line starting at my ear diffusing it all when I am done.
If you want you can now add a highlighter.
I think a matte lighter shade than your skin would be more suitable here than a shimmery shade.
Once again, only healthy alive people are glowy.
I skipped that step since I am lazy!

How to look (pretty) dead tutorial
Now I have cheek bones, sort of...
This is very simple eye make up.
You can add more or even skip some if you want.
In my case I skipped the mascara. I have been quite lazy with mascara recently, and skip it often when I do darker eye make up since they aren’t really visible then. I always curl them though and sometimes add some Vaseline to make them look darker and shiny.
Apply brown pencil around you eyes.
You can do it in whichever shape suits your eyes.
I did it with a tiny bit of a flick on the end to make my eyes look more catish.
Smudge it a tiny little bit. It doesn’t have to be perfect.
You can add more or less than I did.
I kept this pretty simple since I wanted to show you a less over the top look today.
Tightline your upper lash line with a black pencil and also add some to your waterline.

How to look (pretty) dead tutorial
Brown pencil above, added black pencil below
Fill in your eyebrows as usual.
If you use mascara this would be the moment to do so.

How to look (pretty) dead tutorial
Pondering if this version is too corpsey...
Now you have a few options on how to finish this look.
You can go for the completely corpsey look and add concealer to your lips, or instead add some nude lipstick for a just slightly dead look.

I decided to go with a dark lip tint instead to make this a little more vampiric.

How to look (pretty) dead tutorial
When in doubt you can always go as a vampire bunny
As a last option you could add some blush. 
The thing is though, if you want to look dead blush is not the way to go.
If you aren’t comfortable without blush a lavender shade is the perfect color.
Lavender is perfect for putting some color on sickly faces without making them look happy and fresh. It is a very toned down color that can make people look even paler!
I love my Lavender blushes, they can be used for a wide variety of looks and are fun to use.

How to look (pretty) dead tutorial
I am pointing to my Lavendered cheeks, quite subtle but it makes a difference
So this is it dear Batlings.
I hope you enjoyed this little tutorial.
Do you like wearing pretty dead make up?
Is it just a dress up look for you or a daily occurrence?
What are your tricks to make you look gaunt and sickly?

How to look (pretty) dead tutorial
This is the full look wearing vintage clothes and "new shoes"

Etude House Princess Make-up table review and instructions


http://cosmetic-love.com/etude-house-princess-makeup-table-1ea.html?sl=EN

Etude House Princess Make-up table

Features
Etude House Princess Makeup Table
Clean your vanity with a 360-degree revolution available make-up table!
Anyone can assemble this in 3 mintues!
Capacity
1300g

Etude House Princess Make-up table
Princess Make-up Table box
A little while ago I saw that Etude House had released a Make up table, when I saw it for the first time I hyperventilated for 5 minutes and then went on a 30 minute spree of finding a place where it would be available for purchase.
I finally found it for sale on Testerkorea.
I placed an order on the 1st of June, more details about that can be found in this Haul post.
When I finally received it I was so ecstatic!

OMG ETUDE HOUSE PRINCESS MAKE-UP TABLE!
You must know I moved into a new place in January and we only have 4 pieces of furniture, a vanity is not one of them.
Unfortunately we have a very small bathroom as well, besides that I like doing my skin care routine in my bedroom.
So you can maybe imagine that I have quite a bit of skin care and make up, all stashed away in boxes since I have no place to put it.
Until now I used a plastic box containing Johnny Clydes and my current skin care routine.
I had it next to my bed and put it on the bed whenever I used products out of it.
You can imagine how much rummaging I had to do in the box to find the correct product and just how unorganized and not pretty it was.

So maybe now that explains why I was so incredibly happy to receive this organizer.
And my goodness has my skin care routine been a breeze since!

Etude House Princess Make-up table
One eyed Kitty guards the box
The Princess Make-up table came in a cute pink box, it even has handles on it for portability!
The box is actually reusable which is a plus point!
When you unpack it the pieces come inside plastic bags surrounded by little peanuts for padding.
It also includes super glue, which I haven’t used since I don’t know if I will paint mine yet, and a sheet of see through stickers which I don’t know the use of since I don’t read Korean.
If you do though, I would love to know what they are for!

Etude House Princess Make-up table
Eyeless Kitty tells me how to build this
The instructions are pretty straight forward.
If you take the bottom part you will see that it has a round white thing attached to the bottom, make sure it is properly attached and not just laying on top of it.
There is latches were it fits in, mine was already attached but detached during the building process.

Then put the long walls in the shape of the pentagram into the little spaces that are visible in the bottom part.
It should look like step 1.
In step 2 you just add the pentagram shaped piece that has scalloped edges on top.
In step 35 you add the smaller pentagram shaped piece with the compartments on top.
In step 4 you add the little pie shaped pieces into one of the 3 slots available on the side walls.
This can be a little tricky, they need to be wedged in securely, you can use a little bit of force to achieve this.
This step took me a few tries, since every time one pie piece was in, the next one fell out when I tried to put a new one in.
I just changed the side I was working on since I realized that it all needs to be aligned perfectly for it to work.

Etude House Princess Make-up table

I realize that they say that you should put the pie pieces into the slots before you add the top part, it might be easier but since I didn’t glue it down it was all too wobbly to do it that way.
The whole procedure took me under ten minutes, so it is really quite easy to do.

Etude House Princess Make-up table

It turns around super smoothly and it makes all my essentials easily accessible.
I am so happy with my little organizer!
It is super pretty and incredibly useful!

Etude House Princess Make-up table
So pretty!
Both Johnny Clydes and my daily skin care routine fits in there including some make up and random skin care I had laying around.
I still have one side free for future things.
It  is 26 cm high and 23 cm wide which is both small enough to not take too much space in your room but big enough to fit in a lot of Skin care and Make-up.
All Korean items fit into the organizer, but I have 2 western products that are too large to be put in there.
The quality is sturdy plastic, and I am not worried that it will break down any second.
If they would come in different sizes I would definitely buy another one!


I need moarrr! All sizes all colors!
Rating: 1.Blegh  2. Pff  3. Meh  4. Oohh  5. Awwyeah 6. Wooha 

 
Purchased at Testerkorea
Available at Cosmetic-Love

How do you organize all of your skin care and make up?
Do you have a Princess Make-up table and how do you like it?


Johnny Clyde and how to (not) apply Make-Up


So after reading Samplehimes post on how her boyfriend applied Make up onto her face, I knew I had to try this little experiment out with Johnny Clyde.
I laid out several products for him to choose from and gave him 2 rules:
1: I will answer 4 questions ( He only used 2 of them, can you tell?)
2: I will give you two hints (One of them was use mascara as the last step of the eyes, no other hints given.)

Now I will pass the torch to Johnny Clyde so he can explain to you how exactly to beautify a woman, and make her look her best! 

Me, the victim, smiling like a fool!
Today I am going to be teaching you all how to apply make up.
Make sure you read carefully. My method is very precise and it's easy to make mistakes.
So remember!
If it doesn't turn out the way it did for me, you probably missed a very important keyword, so re-read it and try again.

Step 1: The Understanding
Familiarize yourself with your available products. Walls, balloons, baby heads, these are all good things to experiment with to better understand which methods work best with which tools.
After you've loosely identified everything (don't worry about specific names. Doesn't really matter. "stick" is good enough) hold each item up to your forehead to understand the chi it has.
If it's chi feels unbalanced, fret not. This does not mean this product is useless, it just means you're going to have to take it away from the other products for a little bit, and calm it down.
This is very important for lipsticks, especially.
Lipsticks are pretty sensitive.

Available a selection of Western and Asian make up products
Step 2: Stretch
I cannot stress enough, the importance of stretching. There isn't even enough room on this entire blog for me to detail the importance of stretching.
Just be sure to do it.
Also be sure no pets or close family members are in the room with you while you perform your makeup stretches.

Step 3: Apply Powder #1
Powder number one should be applied first.
It's very simple, with your little sponge rag, pat the powder until you cough from the residue.
Then lightly dab that sponge rag all over your face, be sure to get every inch of your face.
Including your nostrils.
A lot of people skimp out on the nostrils.
The fools.
My reaction after he smeared an incredible amount of my precious Cats Wink Pact onto my face!
Step 4: Apply Eye Stick
This is where practicing on a wall comes in handy.
Once you've got a nice powder all over your face, it's time to move onto the eyeballs.
Pull the two flaps above the eyeballs down, as you draw a straight line across.
Be sure to get the bottom flap, too.
Then the two lines meet at a point.
This is what we in the makeup business, call a reunion.
These are essential for survival.

His reaction after drawing eyeliner in my eyeball. He asked me if I felt it, hahaha of course, it's my eyeball!
 Step 5: Eye Flaps continued
Now it's time to apply the shadowy bits to the eye flaps.
What color shadowy bits should you use?
Well, I'm glad you asked, friend.
Look outside, what color is the sky?
That's the color you should use.
The reason for this is, birds. Birds are naturally attracted to colors that differ from the current sky color, and by attracted, I mean they will try and kill you.
 So for today, it was pretty gray.
Make sure you really dab it on there, all around the eye. Both of the eyes.

Purple eyeliner, grey eyeshadow and some mascara aka barb wire scrub scrunch-a-magic


 Step 6: The Face
Now it's time to apply all sorts of stuff. Take your paint brush, and dip it into the darker powder. Darker than the powder you used earlier to apply everywhere.
Now here you should really experiment, but don't stray too far from the path, or you could end up looking ridiculous.
Make sure to get all over the face AND the nostrils.
 Lastly, take the darker powder, and dab two dots on each cheek.
This will give you a 'doll' look, but is not recommended for major holidays.

He actually applied brown glittery blush all over my face! I could barely hold myself at this step!

Step 7: The Lips
This is basically a coloring book.
Real easy stuff, unless you've got zero talent.
Choose which lipstick color you want, and pucker your lips.
Then spin the lipstick as you apply it everywhere.
Now open your mouth real wide and get in all those hidden lip cracks.
This is the only time you should not be eating food. Because it will likely fall out of your mouth.


 Surprisingly good lipstick application!

Step 8: The finishing touches
Now you take that little black barb wire scrub scrunch-a-magic and bring it up real close to your eyes. This seems scary at first, but grow up.
This is for your eyelashes.
It cleans them.
People don't realize how dirty their eyelashes are!


In fact, they're so dirty, that if you're cleaning your eyelashes with your little black barb wire scrub scrunch-a-magic and you miss, you'll notice some dirt residue left on your face. Just leave it, it's too late anyways.
Ok!
That's it!
Now you're ready for the world.

The artiste seems proud with his work!
Last rule, though, this one is very important.
Don't check the mirror.
Mirrors and cameras are terrible liars.
If you heard the things they say behind your back, I wouldn't even have to tell you.
Just go straight out into the world.
You're beautiful

If the artiste tells me to flex, I flex!
In return I got to take away his beloved eye circles, and to be honest its super creepy!


Only less then 24 hours to enter my super awesome Etude House Giveaway! 

http://35thofmay.blogspot.de/2014/06/35th-of-may-celebration-giveaway.html


Make-up guide for the cosmetically impaired

Beware spoilers: Finished look
This is a guide for those kind of people who may either never have used make up, used very little, or the last time they did was the early 80s and they are trying to avoid that look.
But Ey if you would like to rock the early 80s look I am happy to do a tutorial on that too!

Still love Mr Bowie!
So this guide will be very basic, in its techniques and its utensils.
In my opinion there is a minimum amount of products needed, but I will try to give the very adventurous some options to expand and add some extra tricks in there.

You will need at least:
Foundation and or concealer
1 brown eye pencil
1 lip stick
Mascara
add ons:
Eye shadow
Blush
Powder

First, we start with a clean and moisturized face. If you don’t know how to do so or why you should do so, refer to this post.
If you don’t have a nice prepared canvas, anything you apply to it wont look nice.
I believe we have evolved a little since the 18th century were perfume was the shower de rigueur, so just think of it like that.

More, I need more!
Second, groom your eyebrows! As skin is the canvas eyebrows are the frame! This guide is so basic it does not include how to trace your eye brows. It really is an important step though, but since many people get little heart attacks just thinking about painting their eyebrows, at least have them nice and neat.

always add a Ryan Gosling meme!
There are 3 options here, you want to wear foundation which is option number 1,
If you are to lazy to wear it, or you just don’t like it, and or don’t want to spend money for a product you will use 3 times in your life proceed to option number 2.
Foundations is a tricky thing, you need to figure out your skin type, look for a foundation that suits that skin type and then of course find the perfect shade. Proper make up and department stores are your friend! The ladies there will inform you of the foundations that might suit your skin type best and then even proceed to match one to your skin tone!
Beware! It seems to be fashionable to be tan now a days, so many beauty ladies match foundations too dark than their clients skin, just to please the customer. Don’t fall into that trap.
If you want to look tan then use bronzer, if you use too dark foundation it will look off eventually!


Pro tip: Take a mirror and check the foundation outside on the street too see how it actually looks. Check your jaw and make sure that the color matches your neck.

Now, you don’t need to buy a department store foundation of course, but if you know nothing about foundations that trip might be very educational and teach you on what to look for when you buy whatever foundation you want.

Application: The easiest way to apply foundation is to put a little on your fingers, warm it up in your hands and spread it evenly on your face.

My favorite concealer right now is Misshas Perfect concealer
 So for those who can’t be bothered with foundation Concealer is your friend! If you don’t have the skin of a vampire or fairy or maybe vampire fairy, you might want to invest in a concealer.
It will hide your flaws in a natural way and sometimes make foundation unnecessary.
And if you are into a little alchemy you can even make a foundation out of your concealer!
You can definitely apply concealer on top of your foundation if you have a lot of blemishes, scars or the like.
But if you decide to go with the concealer only route, choose a concealer that you feel most comfortable with and find the prefect shade. Once again people have the misconception that concealers are suppose to be lighter than your skin, unless you are into looking like a panda I would try to find a shade that closely matches your skin.

Stay on the safe side and match your concealer to your skin tone
Application: take a little bit of concealer with your finger and tap it onto the back of your hand, dab it on your blemishes and other parts you want to hide. Blend out the edges by tapping them with your finger.
To conceal the under eye area apply the concealer in a sort of triangle shape and blend gently with fingers.

concealer-application
add concealer to blemishes, for under eye circle apply in the shape of the stars
For the Alchemically inclined: Take a little bit of concealer and mix it with some moisturizer and BAM you have a foundation!

Option 3: Screw everything! You do have the complexion of a supernatural creature or simply don’t care how your skin looks then proceed to the next section of the guide.

The eyes!

If you want to own one of those beauty items that you can do a million things with, get yourself a brown eye pencil. Brown suits everyone and can be used in a natural or even more daring way.
Most people think black suits everyone but believe me it doesn’t.
I recommend you choose a pencil with a medium creamy texture. You don’t want it to tuck on your eye when applying it, but also not to smear everywhere.


Application:
Line the upper part of you eye like so:
First make a line from the inner corner of your eye to where your lashes end.

Hold your eye lid taught for a smoother application.
If you like the cat eye look, make a tiny line upwards while looking directly into the mirror and then join the lines.
For a more natural look you can blend that out with your fingers, a q tip or those spongy ends that come on some pencils.
For the lower part of your eye dot some eye pencil like so and then blend.
For a stronger look make a solid line and then blend.

Draw line, join them and then proceed to the lower lash line

If you feel this isn’t exiting enough for you but you can’t be bothered with eye shadow then you can fake an eye shadow look with that same pencil.

With a light hand make little stripes on the outer side of your lid making a sort of v shape for extra lift and depth.
Blend like crazy and voila!

add some pencil in the shape of the stars, then blend
If you think applying eye pencil is so totally not daring enough, you could try out some eye shadow.
If you don’t own one already I recommend picking up a neutral non glittery palette of at least 3 shadows in brown tones.

My favorite palette Dior Beige Massai, I used to steal this from my mom when I was younger :)
The shadows should be matte or slightly satin, but please stay away from the glitter!


Start with bare eyes, then use the lightest shade underneath your brow, and on your eyelid and then with a darker shade you do the little v thing again. blend blend blend.
Add the eye pencil as in the first step of the eye section on your upper and lower lid, or use even darker eye shadow to add definition in the same way.

1st add light shadow under your brow and on your eye lid, 2nd add medium dark shadow to your crease, 3rd add eyeliner or dark eye shadow

Now to finish any eye you need mascara. There is a gazillion, just choose one, maybe the one with the most outrageous and fake looking advertisements?
If you are super duper brave use an eyelash curler like so:

This is my startled animal face
If you don’t feel like putting space age looking gadgets to your precious eye balls apply mascara without the curling.
You apply the mascara going as close as you can or dare to your lash line, and with a left and right movement you slowly brush them up.

Pro tip: Tap the excess mascara on the tip of the wand onto a tissue for a better application, and never ever pump your wand into the tube!

Left, right and up movement
You may end this whole ordeal here if you want, but if you would like to add some color to those cheeks and lips read on.

Lipstick:
As for the shade if you never wore lipstick before the safest options are a medium pink or rose, or a corally peach. These look the most natural and suit all skin tones. Like the foundation you need to try them out to find the right shade for you. There is a million different formulations out there but my favorites are lip tints, liquid lipstick (not to be confused with lip gloss) and the good old regular lip stick in a tube.

Maybe a little less up top...
For a natural look, and for your own sanity, if the thought of applying lipstick in a non clownish fashion throws you into sweats and frenzy, dab it on!
You might see a pattern here, and yes I dab everything on. It just looks the most natural and lets you regulate the amount of product very well.

dotted                                                 blended
Dab some of the lip product on your lips straight form the tube or with your finger and then blend.
For visibility purposes i chose a very bright pink!

Now you are at a cross roads again. Either you let your pretty lippy multi task or you delve into the deep and dark arts of The BLUSH!

dotted                                                   blended
To use your lipstick as a blush, guess what! Dab some with your fingers on your cheeks and blend.

How I apply powder blush
If you are more the dark arts kind, choose a blush in a similar shade to your lipstick and apply it to your cheeks. If it is a cream blush follow the lipstick blush instructions. If it is a powder blush, put some on your brush, tap it off a little to get rid of excess and
swish it back and forth starting a little below your temple towards the apples of your cheeks.

Work it into your skin, don't just fluff it over your face or you might wipe of previous make up or concealer
Bonus step:
You own a face powder and are dying to use it, or you really want to use powder because its soft and nice and who wouldn’t want to feel those soft fluffy brushes against ones skin.
If you belong into one of those categories take your powder, add it to a puff or brush and roll it against your face in a downward motion to set your make up.  Do this as your last step but not if you used cream blush or lipstick as blush. It would stick to it and not be pretty.

Make sure to not add too much powder to your puff or brush

And this concludes the longest blog post in the history of nothing.
Feel free to ask questions into my belly or ask for product recommendations!

The finished look: left side with eye shadow and right side pencil only, I dont know why the right eye looks so wonky